zondag 29 september 2013

Chocolate and Cherry Bread that will make your mouth water

Does this bread actually need an introduction? It's just gluten free heaven, filled with dark chocolate and lovely cherries. The original recipe is by Paul Hollywood, my favorite bread guru. I had to change his recipe a bit to make it gluten free. I added the usual things that help gluten free bread to impersonate normal bread, like fiber husk and xanthan gum, but I also had to change the method a bit. Paul lets his bread proof twice, but that will only create a gluten free bread disaster if you do. You end up with a very compact bread, not a lovely fluffy bread as intended. Simply because if you kneed it after it has proofed you will undo the work the yeast has done so far and the dough will not proof properly again. That's what you get when you lack the elastic abilities that gluten bring to your dough and in the end, your bread. So here's how you make Paul's miracle bread without those buggers of gluten to help you. 

Fluffy & light bread filled with cherries and dark chocolate
Ingredients:
  • 500 grams (1 lb 2 oz) of gluten free bread flour
  • Some rice flour to dust the bread with and to add to the dough if it becomes too soft and moist.
  • 6 grams (0.21 oz)of iodized salt
  • 30 ml (1.01 fl oz) of olive oil
  • 20 grams (0.75 oz) of yeast
  • 10 grams (0.35 oz) of xanthan gum
  • 10 grams (0.35 oz) of fiber husk
  • 12 grams (0.42 oz) of granulated sugar
  • 2 tablespoons of brown caster sugar
  • 450 ml (16 fl oz) of warm water
  • 175 grams (6 oz) of drained cherries ( I used canned ones, obviously)
  • 200 grams (7 oz) of dark chocolate
Instructions:
  1. Preheat your oven to 50 degrees centigrade (122 degrees fahrenheit) and put a bowl of water in the oven. This will help your dough proof later.
  2. Take a big bowl and put the flour, salt, olive oil, granulated sugar, yeast, xanthan gum and fiber husk to it and mix it all with a fork. 
  3. Now slowly add the water while you kneed the dough with an electric mixer. Your dough will be a bit sticky but firm. 
  4. Bash the chocolate with a rolling pin until you have small chuncks. Add these together with the caster sugar to the dough and mix again.
  5. Drain the cherries and add them to the dough. Now mix well and add some rice flour if your dough gets moist. You want it a bit sticky but firm again. 
  6. Transfer the dough to a baking tray lined with parchment paper and form into an oval bread with wet hands. (If you do not wet your hands, the dough will all stick to your hands ;-))
  7. Dust the dough with some rice flour and carve the dough diagonal.
  8. Put it into the oven for an hour to let it proof. It will double in size in that hour. 
  9. When the dough has risen, take it out of the oven. Preheat the oven to 200 degrees centigrade (400 degrees fahrenheit).
  10. When the oven is warm, put the bread back into the oven and watch it turn golden in about 25-30 minutes. 
  11. Take the bread out of the oven and let it cool on a wire rack.
Enjoy!

dinsdag 24 september 2013

Glutenfree and Dairyfree Cinnamon Cookies

Fall is here. To me fall means beautiful autumn colors outside, walking through the woods and the scent of cinnamon and vanilla roaming my house. Vanilla is by far the scent I love the most. It lifts my spirit, but combined with cinnamon I get that homely feeling. These glutenfree and dairyfree cookies are wonderful with a cup of soothing tea, a book and a fire crackling away in the fireplace. Fall doesn't sound so bad now does it? :-)

I sprinkled colored sugar and cinnamon sugar on the cookies before baking
Ingredients:
  • 175 grams (0.75 cup) of granulated sugar
  • 125 grams (0.5 cup) of shortening
  • 1 egg
  • 250 grams (1 cup) of buckwheat flour
  • 250 grams (1 cup) of rice flour
  • 0.5 teaspoon of iodized salt
  • 1 teaspoon of cream of tartar
  • 1 teaspoon of xanthan gum
  • 2 teaspoons of cinnamon
  • 1 teaspoon of gingerbread spices
  • 2 teaspoons of vanilla (or the seeds of one vanilla pod)
  • 2 tablespoons of maple syrup
  • 2 tablespoons of soymilk or other dairyfree milk
Instructions:
  1. Beat the granulated sugar and shortening in a large bowl with an electric mixer until light and fluffy. Beat in the egg. 
  2. Whisk the buckwheat flour, rice flour, salt, cream of tartar, xanthan gum, cinnamon and gingerbread spices in a medium bowl. Gradually beat into the sugar mixture. Beat in the vanilla, maple syrup and soymilk to make a soft dough. Make a ball, wrap it in plastic foil and refrigerate for 15 minutes.
  3. Preheat the oven to 180 degrees centigrade (350 degrees fahrenheit)
  4. Roll out the dough between sheets of waxed paper until 0,5 cm (0.25 inches) thick.Cut out the cookies, transfer them to baking trays lined with parchment paper and sprinkle with either colored sugar or cinnamon sugar. Bake 8 to 10 minutes or until the edges begin to brown. Let them cool on a wire rack before serving them.
 Enjoy!

donderdag 19 september 2013

A perfect glutenfree Halloween treat: pumpkin and walnut cupcakes

This is the story of a lonely pumpkin that blossomed into sassy pumpkin cupcakes. There once was a lonely pumpkin, lying in my fridge. It had been there a while, waiting to be turned into pumpkin soup or Jamie Olivers pumpkin risotto... 

Don't worry, I won't write this whole story in fairytale style. ;-)
My husband had nearly thrown a perfectly good pumpkin away, because it was not big enough to make soup or my beloved risotto with. I hate to waste food, so I decided to use it to make pumpkin cupcakes. That left over pumpkin was a great reason to finally try a new recipe that had been lingering in my mind for a while. And since fall is here and that means Halloween is getting nearer, I decided to turn them into a wonderful Halloween treat. 

The pumpkins on top are made with a Wilton mold that normally makes chocolate lollipops.
This recipe makes 12 cupcakes and 3 mini-bund cakes.Thank you Lisl, for giving me those. Whenever I make to much batter, those moulds come in handy. :-)

Ingredients:
  • 300 grams (10.5 oz) of pumpkin. Peeled, seeds removed and chopped to chuncks so you can blitz them with the walnuts.
  • 150 grams (5.5 oz) of walnuts
  • 200 grams (7 oz) of glutenfree riceflour
  • 150 grams (5.5 oz) of cane sugar (granulated sugar is an option too)
  • 3 tablespoons of honey
  • 5 eggs
  • 8 grams (0.28 oz) of vanilla sugar
  • 10 grams (0.35 oz) of fiber husk
  • 10 grams (0.35 oz) of xanthan gum
  • 12 grams (0.42 oz) of glutenfree baking powder (I used cream of tartar)
  • For decoration: powdered sugar and orange melting candy for the pumpkins.
Instructions: 
  1. Preheat the oven to 180 degrees centigrade (350 degrees fahrenheit).
  2. Blitz the walnuts and the pumpkin to a fine pulp/paste in a blender. 
  3. Add the riceflour, honey, fiberhusk, xanthan gum and cream of tartar and mix with a fork. 
  4. Beat the eggs, vanilla sugar and cane sugar to a frothy substance and add to the pumkin, walnut, flour mixture.
  5. Line the cupcake tins with paper cups and grease the bund cake moulds. Spoon the mixture in and place the capcake tins and the bund cakes in the oven. 
  6. Bake it all in 45 minutes till your cupcakes and bundcakes smell delicious and look golden brown.
  7. Leave them to cool on a wire rack. 
  8. While the cupcakes are in the oven, make the candy pumpkins. I used a Wilton plastic mold that makes chocolate lollipops. Melt the candy in a bowl in the microwave or as I did, in a bowl above a pan with softly boiling water. Pour the melted candy in the molds, place in the freezer until the candy has become firm and take out of the mold.
  9. To decorate the cupcakes: dust them with powdered sugar. Make some glazing/frosting with powdered sugar and a tiny bit of water and use it to stick the candy pumpkins onto the cupcakes. To decorate the bund cakes, just dust them with powdered sugar. 
Enjoy!


donderdag 12 september 2013

Glutenfree fig & walnut soda bread rolls full of vitamins, minerals and fibers

As a mom of two boys I get the strangest questions about my kids glutenfree diet. People ask me if the kids can actually eat potatoes, if they can eat dairy or if the diet is is the cause of their slim frame. That's when I start rolling my eyes. First of all, my oldest has been struggling to gain weight for years now and that has not been a picnic. My youngest is below average when it comes to weight (and to us he is bulkier than his brother has ever been). And no, that is NOT because of this diet. 
It is because of celiac disease that Thijmen is very thin and he seems to have inherited my build (I've always been slim until I ate myself into oblivion for some years of my life, but that aside LOL). This diet, that thanks to some brainless celebs who call their kids Apple, is now labeled a great way to lose weight. And it isn't anything as such. 

I've written a whole blog on what this diet means to my kids, so I won't put you all through that again ;-). But what I haven't stressed is that this diet is not as healthy as people make it seem. Because glutenfree flour lacks fibers, certain vitamins and minerals that people who can eat wheat, rye, barley, kamut and spelt wheat will get by means of their daily intake of bread, pasta and such. 
So basically, if you do not substitute that in some way, you will lack nutrients your body desperately needs. How healthy is that? If you feel the need to drop carbs, be my guest, but don't call yourself 'glutenfree'. Because glutenfree products (bread, pasta etc) have often have just as much carbs as the "regular" version. They may be different carbs, but you are still eating carbs. So who's fooling who? Sorry, but everytime I hear or read such nonsense I feel the need to get up on my soapbox. Again. And this blog is my soapbox. Just eat healthy people and use your brain! My mom always says, too much of everything (no matter what it is) isn't healthy. Just think about it, it really is true. 

Anyway, because I need to substitute certain minerals & fibers in my kids food, I like to add (dried) fruits, nuts or even veggies to my kids bread. Today I made small sodabread rolls for lunch and added walnuts and figs. Figs contain a lot of fibers and vitamins such as vitamin A & B and minerals such as iron and calcium. Walnuts are a source of Omega 3, magnesium and vitamine E. By adding them I make sure my kids get the nutrients they need to grow into healthy boys and the bread only tastes better!

They look like regular bread rolls, but you can smell the figs and walnuts a mile away! 

Here's the recipe, it makes 10 soda bread rolls.

Ingredients:
  • 500 grams (1 lb 2 oz) of glutenfree flour
  • 1.5 teaspoon of iodized salt
  • 400 ml (14 fl oz) of goat yoghurt (yes, this makes all the difference, it gives the bread a soft but fresh taste.
  • 35 grams (1.25 oz) of granulated sugar
  • 75 grams (2.75 oz) of soft butter
  • 25 grams (1 oz) of baking powder
  • 75 grams (2.75 oz) of walnuts
  • 100 grams (3.5 oz) of dried figs
  • 2 teaspoons of xanthan gum
  • 2 teaspoons of fiber husk
Instructions:
  1. Preheat the oven to 220 degrees centigrade (425 degrees fahrenheit) and line a baking tray with parchment paper.
  2. Blitz the figs and walnuts into a paste and put it in a bowl. 
  3. Add all the other ingredients to the bowl and mix it all with an electric mixer till you have a sticky but combined dough. 
  4. Wet your hands with cold water and form 10 rolls and place them on the baking tray. 
  5. Carve them at the top and pop them in the oven for about 30-40 minutes till your house smells divine and the rolls are nice and golden. 
  6. Take them out of the oven and let them cool on a wire rack. 
  7. I love these with a bit of soft goats cheese on them, my kids eat them with regular Gouda cheese or preserve. 

maandag 9 september 2013

My kids all time favorite glutenfree Chicken Nuggets

The hardest part of this glutenfree diet, in my eyes, is having to disappoint my children so often. And most of the time it isn't me who is disappointing them, it's the (catering) world around us that does. When we go a themepark or something like that, I always drag a bag around with glutenfree candy, fruits, chips and a glutenfree lunch. I understand catering celiacs is difficult and scary and requieres a staff that knows exactly what they are doing. Trust me, having worked for a company that was responsible for the retail and catering on train stations, I know exactly how difficult it is. Yet the mom in me wishes more restaurants and F&B managers in themeparks or zoo's took it seriously. Took a chance. See catering for people living on a glutenfree diet as an opportunity instead of something scary and difficult. Providing defrosted glutenfree bread, (sometimes) a plate of french fries (that usually is a hit with my kids) or a salad with barely anything in it is a nice try, but it is unimaginative and easy. It's safe. And would you serve that to your "normal" guests as well? I don't think so. But this wish is something other people stuck on diets will probably voice too. Because catering is a general thing and in general, most people are not stuck on a diet for life.

Because options are so limited and because I understand it takes time & effort to cater for people with special diet needs I drag around my bag of food everywhere. Because in the end, a fun day is not determined by what you eat, but by the fun you have together. Often I promise my kids their own sandwich at the location and a feast when we get home. And in the feast I serve them these glutenfree chicken nuggets, or as my youngest son Gijs calls them: Chicken Muppets. And they are sooo easy to make!

Even though I am fully aware that most people who eat glutenfree will know how to coat meat with glutenfree breadcrumbs, I'm sharing this because the secret to them is the herbs that I add to the glutenfree breadcrumbs and the use of chicken fillets made from chickens who actually had a good life. I buy mine from our local butcher who knows where those chickens come from and knows they weren't pumped full of anitbiotics. Don't go for cheap meat! (Ouch, I sound like Jamie Oliver now, don't I? :-))

After eating these home made chicken nuggets you'll never want to eat a processed meat kind of nugget, I promise!

My kids favorite feast food!


Ingredients (for 4 people):
  • 3 chicken breast fillets
  • 2 eggs (beaten)
  • 150 grams of plain glutenfree flour
  • 200 grams of glutenfree bread crumbs
  • 1 tablespoon of dried thyme
  • 1 tablespoon of dried oregano 
  • salt & papper to taste
Instructions:
  1. Cut the chicken fillets into even pieces.
  2. Take three plates or bowls and fill one with the glutenfree flour, one with the beaten egg and one with the breadcrumbs.
  3. Season the glutenfree flour with pepper and salt.
  4. Add the herbs to the glutenfree breadcrumb and mix well.
  5. Now coat the pieces of chicken in the following order: Dust them with the glutenfree flour (I use a fork and roll them through the flour), coat them with the egg making sure there is egg allround the meat and then roll the egg covered chicken through the breadcrumbs with herbs.
  6. When all are coated, fry them in batches in your deep fryer (temp 175 degrees centigrade or 350 degrees fahrenheit) for about 5 minutes till golden and crispy. If you don't have a deep fryer a pan with some olive oil will do too. Make sure the oil is hot before you fry the nuggets, otherwise the crust will soak up the oil, resulting in soggy nuggets. You can test the oil by dropping a but of breadcrumb in the pan. When it sizzles and bubbles, your oil is hot enough.
Enjoy!

donderdag 5 september 2013

An easy glutenfree treat: coconut cookies with chocolate pirate coins

Even though my sons birthday is months away, I'm already testing recipes for treats for his schoolmates. Not because I have to see if the recipe works, but to see how much work is involved. Because no matter how often I promise myself to make it easy, I never keep to my word. The result is that I end up in the kitchen for hours and when my husband comes home he shakes his head and then... does nothing except say: "If i was in charge of birthday treats, I'd buy them all a little bag of crisps". Well, how much I hate the time it takes me to make these birthday treats, I would never ever even consider that. Why? Because it's boring, it's an easy way out and it's not exactly healthy now is it? 
Not that my treats are usually very healthy, but they are small, i know what is in them and they are creative. Basically, a bag of crisps is just beneath me. Oh good lord, I am a treat snob! 
But since I am determined to make these treats easier this time, I'm testing a couple of ideas way ahead. This recipe is one of them. 

They are coconut cookies that are very easy to make. The most work is in the chocolate coins as you have to pour those. And I have a mould for them, but it only makes 4 coins at a time. But other than that, this recipe is a breeze. Now let's hope my little pirate loves them too. 


Argh, argh, argh!

This recipe makes 12 coconut macaroons.

Ingredients:

  • 125 grams  (4,5 oz) of grated coconut
  • 7 grams (0.25 oz) of vanilla sugar
  • 1 tablespoon of glutenfree rice flour
  • 1 teaspoon of xanthan gum
  • 3 egg whites
  • 100 grams (3.5 oz) of (powdered) icing sugar
  • About 175 grams (6 oz) of dark chocolate (for the coins) 
Instructions:
  1. Preheat the oven to 150 degrees centigrade (300 degrees fahrenheit).
  2. Mix the coconut, vanilla sugar, rice flour, xanthan gum and icing sugar in a bowl. 
  3. Whisk the egg whites in a bowl to firm peakes.
  4. Fold the coconut mixture into the firm eggwhites.
  5. Line a baking tray with parchment paper and make 12 heaps of dough (it is quite sticky dough by the way) on the parchment paper.
  6. Put them in the oven for 30 minutes until they are lightly golden. 
  7. leave them to cool on a wire rack when done
  8. While the cookies are in the oven, make the chocolate coins. melt the chocolate in a bowl that you place on a pan with softly boiling water. Pour some chocolate into the mould and place it in the freezer to make the chocolate solid again. Slowly take them out of the mould, be careful not to bake them and place them on some baking parchment in the freezer until you have enough coins. 
  9. Then pour a little bit of chocolate onto the fully cooled coconut macaroons, put a coin on them and quickly put them in the freezer again. Otherwise the warm chocolate will melt the coins again. 
  10. Voila, your pirate treasure treat is finished! 

dinsdag 3 september 2013

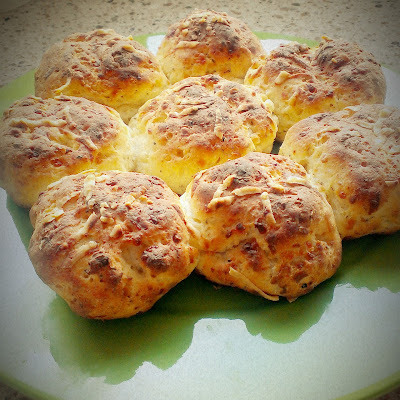
My Middle Eastern - Mediterranean fusion: bread rolls with yoghurt, feta, pecorino and mint

Yes, yes, I know! Fusion is a horrible word for saying: I took your original recipe, threw in some other ingredients and messed up your dish. To be honest, I don't like the word and the hype that was once created around it, but it got your attention, now didn't it? :-)
Fusion was once a hype, where chef's would make the most horrid combinations by mixing up two dishes from different origin and tadaa... a new cuisine was created. 
How "new" it was I don't know, because fusion is basically what we do daily in the kitchen, isn't it? I mean, the Italian dishes we serve in The Netherlands do by no means resemble the dishes you would eat in Italy. Why? Because we adapt it to our own taste and cooking methods that we are used too. We all do that. I do stuff like that daily in my kitchen. And this recipe is no exception, but in this case I feel a bit of remorse for doing so. Let me explain:

The basic recipe is from an exquisite cookbook called Saha, a culinary trip through the Middle East by Greg and Lucy Malouf. I once bought it as reference when I was working as a concept manager for a chain of Doner restaurants. I just wanted to read up and see how we could eventually expand the menu. You know, get some ideas. The book was just so beautiful and recipes so delicious I kept it on my desk as an ornament. The book just breathed Middle Eastern hospitality and ancient culinary traditions that captured my heart. When I left to another job (I went back to what I love doing most, being a communication consultant and writing for company magazines etc) I took that book with me, determined to cook from it often abiding to the culinary traditions that I loved when reading the recipes. Well, I haven't cooked from it, until today. And I left that job 5,5 years ago. So it was about time. 
And now, when I make the first recipe from it, I do that fusion thing to it. I'm sorry Greg and Lucy. I apologize from the bottom of my heart for putting a twist on your recipe. I promise next time I will make this recipe with Haloumi (which my supermarket in my un-cosmopolitan village just didn't have) and with parmesan instead of pecorino. I solemnly swear. 
If you could only smell these babies! 
Ingredients:

  • 325 grams (11.5 oz) of basic glutenfree breadflour
  • 7 grams (0.25 oz) of xanthan gum
  • 7 grams (0.25 oz) of fiber husk
  • 10 grams (0.35 oz) of dried yeast
  • 8 grams (0.28 oz) of granulated sugar
  • 5 grams (0.125 oz) of iodized salt
  • 3 tablespoons of olive oil
  • 100 ml (3.5 fl oz) of lukewarm water
  • 200 grams (7 oz) of Turkish yoghurt
  • 100 grams (3.5 oz) of grated feta (if you want to do it right, use Haloumi)
  • 50 grams (1.75 oz) of grated pecorino (or the original parmesan!) and a bit to put on top. 
  • 1 tablespoon of mint
Instructions:
  1. Preheat the oven to 50 degrees centigrade (122 degrees farenheit) and put a bowl of water in the oven. This will help the dough to proof. 
  2. Put all the ingredients in a bowl, following the ranking of the ingredients above. 
  3. Mix it all with an electric mixer till all is combined and you a left with a lump of sticky dough. Don't be alarmed, glutenfree dough needs to be a bit sticky. It needs the extra moisture in the dough to help it proof.
  4. Now wet your hands with lukewarm water and created little balls of dough. The water will keep the dough from sticking to your hands. I made 8 and put them on a tray lined with baking parchment. Put them close togehter, so when they proof they will merge a bit. You can tear them off at the dinner table (or lunch table as we did ;-)).
  5. Brush some olive oil on each roll and then top with some grated pecorino. (Also, the pecorino is not in the original recipe, but I figured it would make the rolls look even more pretty)
  6. Put them in the preheated oven for about 1 hour and 15 minutes. 
  7. Take them out, let them rest a while while you preheat the oven to 250 degrees centigrade, 482 degrees fahrenheit). When the oven is at the right temperature, bake the rolls in about 15-20 minutes till golden and they make your mouth water.
  8. Let them cool a bit, but serve them while still warm.
Enjoy!