zaterdag 30 maart 2013

A glutenfree version of traditional Laganes-bread

This traditional bread from Cyprus is usually made the day before Lent. So I'm actually a bit late on making it, but my kid picked from my bread bible: 100 great breads. And who am I to object?
This bread traditionally is also made as a flat bread, but I felt it would make a nice 'boule' as well (and it is easier to slice and freeze as seperate breadslices for the kids). So if I've broken with ancient traditions, I'm sorry but convenience won the battle from tradition.
Cypriots use mastika in this bread, but pulverized fennel seeds are a good replacement according to Paul Hollywood.
Here's how I made it, based on Paul's version.


Ingredients: 
  • 1 teaspoon of mastika or pulverized fennel seeds.
  • 500 grams (1 lb 2 oz) of glutenfree bread flour 
  • 1 teaspoon of bakers salt
  • 30 grams (1,125 oz) of yeast
  • 1 teaspoon of fiber husk
  • 1 teaspoon of xanthan gum
  • 60 ml  (2.25 fl oz) of olive oil
  • 350 ml (12 fl oz) lukewarm water (the original recipe said 300 ml (10 fl oz), but glutenfree bread always needs more water)
  • 50 grams (1.75 oz) of sesameseeds
  • 20 grams (0.75 oz) of poppy seed (this is my addition, it wasn't on the original recipe)
  • 1 tablespoon of caraway seed
  • 1.5 tablespoon of cumin seeds
Instructions: 
  1. Grind the mastika or fennel seeds until pulverized. Put flour, salt, yeast, olive oil, xantan gum, fiber husk, and water in a bowl and mix for 3 minutes. Add the mastika or fennel seeds and kneed till you have a firm dough. Let it rest in the bowl for an hour. I did this in the oven on 35 degrees centigrade (95 degrees Fahrenheit). 
  2. Put the sesameseeds, poppy seeds, caraway seeds and cumin seeds in a bowl and pour warm water on it till all seeds are covered. Leave it for 20 minutes. The seeds will swell and release their aroma. 
  3. Put a sheet of baking paper on a baking tray. Make a ball from the bread and flatten it slightly. Roll this through the seeds till the bread is fully covered. Let it rise in the warm oven for another hour. 
  4. Take the bowl out of the oven. Preheat the oven on 220 degrees centigrade (425 degrees Fahrenheit), puncture holes in the top of the bread with your fingers and put it into the hot oven for 25 minutes till its golden and smelling wonderful. Let it rest on a wire rack and let it cool. 
Enjoy!

zondag 24 maart 2013

Glutenfree soda bread made with love

I own tons of cookbooks. Not so surprising as I love to cook and bake. And the best thing is that I use many of them, I make recipes from all, I have favorites bookmarked and all my cookbooks look like they had a food fight. I'm a messy cook, but I blame that on my passion for cooking. ;-)
But after the diagnosis of my son my cookbooks on baking bread disappeared to the back of my cookbook shelf, thinking I would never use them again. With pain in my heart I let go of my Paul Hollywood's 100 great breads, my bread bible. But over 5 years later I feel confident enough to adapt those recipes to make glutenfree goodiness. Today, I dusted off that same book and baked Paul's Irish sodabread, except I made it glutenfree of course. And I remembered why it has been my bread bible for so long. The bread is heaven. 

If this doesn't make you hungry, what will? 


Ingredients:
  • 500 grams (1 lb 2 oz) of glutenfree bread flour. All purpose flour will do too probably. 
  • 20 grams (0.75 oz) of glutenfree baking powder
  • 7 grams (0.25 oz) of fiber husk
  • 7 grams (0.25) of xanthan gum
  • 1 teaspoon of bakers salt
  • 75 grams (2.75 oz) of soft butter
  • 150 ml (5 fl oz-¼ pint) of milk
  • 225 grams (8 oz) of Greek yoghurt (instead of 150 ml of buttermilk from the original recipe which I didn't have)
  • 2 middlesized egged, loosely beaten
  • Some (sesame) seeds to decorate your bread


Instructions
  • Line a baking tray with a sheet of baking paper.
  • Put the flour, baking powder, salt, fiber husk and xanthan gum in a bowl and mix well. Add the butter and work it through the flour.
  • Add the other ingredients and mix to make a firm dough.
  • Make a ball from the dough, put it on the baking tray and let it rest for 20 minutes while you preheat the oven to 200 degrees centigrade (400 degrees fahrenheit).
  • Carve a cross in the top of the dough ball, use some milk to gloss over the top and add some (sesame) seeds to decorate the dough. 
  • Bake 30 to 45 minutes (depends on your oven) until it turns golden and smells heavenly. Let it cool on a wire rack before you eat it all with some salted butter on each slice. ;-
I will probably attempt to bake many more breads from my so beloved bread bible now this was such a success, so keep an eye out! :-D

zaterdag 23 maart 2013

Mix & Match glutenfree granola bars

Usually my kid takes fruit to school as a morning snack, but many of his friends bring in a granola bar because that is approved by the school too. The morning snack has to be fairly healthy. As he wants to fit in too, he asked me if I could make granola bars. "Yes, of course!" was my answer. Ready made glutenfree granola bars are expensive and it is something you can easily make yourself. And they taste even better too! They are also a great way of using up stuff you have left over, as nuts, dried fruits, raisins, glutenfree breakfast cereal, glutenfree oats etc. That is why this recipe is called Mix & Match granola bars, you can make your own favorite. Just toss in what you like, but stick to the amounts given.
It takes up half an hour of your time and you have a wonderful treat to give to your kid in their lunchbox or to treat yourself with at the office when you are in need of some extra energy and fibers. 

Home made & delicious!

This recipe is made with refined sugar and condensed milk, so it's not extremely healthy, but you can always replace the sugar with honey or maple syrup. 

Ingredients: 
  • Grated zest of one lemon
  • 75 grams (2.75 oz) of dates without kernels, chopped
  • 75 grams (2.75 oz) of walnuts, chopped
  • 75 grams (2.75 oz)of almond shavings
  • 125 (4.5 oz) grams of light caster sugar
  • 150 (5.5 oz) grams of oat flakes (you can also use millet flakes)
  • 40 grams (1.5 oz) of glutenfree breakfast cereal or cornflakes (I use oat crunchies)
  • 4 dl (14 fl oz) of condensed milk
  • 25 grams (1 oz) of pecannuts

Instructions:
  1. Preheat the oven to 180 degrees centigrade (350 degrees fahrenheit)
  2. Toss all ingredients in a bowl and mix well
  3. Line a baking tray with baking paper and put the mixture on the baking tray  and spread it out evenly, press it to make it a firm cake.
  4. Bake in the preheated oven for about 20 minutes untill the top is golden. I then turned it upside down onto another baking tray and baked it in 20 minutes till the bottom was golden too. The original recipe didn't say that, but in my case the condensed milk had sunk to the bottom, making the bars soggy instead of caramalizing them. If needed turn one more time if you find the condensed milk has sunk to the bottom again to let that last bit caramalise too. 
  5. Take out of the oven, let it cool before you slice the slab of granola cake into bars. 
  6. You can keep them in an airtight container for a couple of days. 
Have fun creating your own favorite glutenfree granola bar! 


zondag 17 maart 2013

Sundried tomato and parmesan bread aka pizza bread

Since no one loves to eat the same thing day in and day out I've adapted my basic bread recipe with variations. My kids, like all kids, doubt food that doesn't sound familiar, or doesn't sound cool. So when I first made this bread my now 6 year old said 'EEEWWWWW!' when I told him I made sundried tomato bread with parmesan cheese and some herbs. Also, the fact that the chopped tomatoes had colored the bread red (according to my son it is pink, but color blindness runs in my family ;-)) at first put him off. But when I told him that it was 'pizza bread', it suddenly was the best thing I had ever made.
And so from time to time, I make pizza bread and I'm my kids biggest hero again. 
The following recipe is a copy of basic glutenfree bread with some extra additions.


I make this bread in my Breville breadmaker, but you can also make it in a conventional oven. If you ever want to buy a breakmaker, the Breville one is brilliant and it saves you tons of time. It's the one you definitely want, even though it doesn't come cheap. It's worth every dime, penny or euro!

Ingredients:
75 grams (2.65oz) of chopped sundried tomatoes
75 grams (2.65 oz) of grated parmesan cheese
750 grams (26.455 oz) of glutenfree all purpose flour
700 ml (23.67 fl oz) of lukewarm water
10 grams (0.35 oz) of fiber husk (to add more fibers to your bread and to improve consistency)
3 tablespoons of olive oil (in this case I use the oil from the jar of sundried tomatoes as it has tons of flavour)
2 teaspoons of xanthan gum
12 grams (0,42 oz) of sugar
18 grams (0,64 oz) of yeast 
6 grams (0,21 0z) of baker's salt (you can use normal salt too but bakers salt adds iodine to your bread which gives a better taste to your bread)
1 tablespoon of Italian herbs 
Some extra grated parmesan

Made in the breadmaker: 
Put the sundried tomatoes in the kitchenmachine and grind them to a paste. 

Add the lukewarm water to bread mold. Put in the fiber husk and the olive oil from the sundried tomato jar. 
On top of that you add the glutenfree all purpose flour. Now you add the sugar, xanthan gum, bakers salt or normal salt and the yeast. Make sure the yeast does not come in direct contact with the salt, because that will diminish the effect of the yeast. Then add the sundried tomatoes and the parmesan. 

Put the bread mold into the machine. If your machine has a French bread setting, use it! It gives the best result, as it allows the bread to develop and proof very slowly. If you don't, some machines have a glutenfree setting. Just make sure that the bread gets the chance to develop well. Help the machine along with a wooden spoon or fork when it mixes the dough, as it will turn into one heap and will not mix everything sometimes. That's what you get when you have no gluten to help the dough to stick together. When the machine is done mixing, sprinkle the Italian herbs on top and add some extra grated parmesan cheese to taste. Now wait and be prepared to take a wonderful loaf out of the machine when it's done. 

In the conventional oven:
If you use a conventional oven, put it on 35 degrees centigrade or 95 Fahrenheit so your oven is warm enough to let your dough proof. 

Put the sundried tomatoes in the kitchenmachine and grind them to a paste. 

Put everything in a big bowl in the same order as you would in the breadmaker. 
Add the lukewarm water to bread mold. Put in the fiber husk and the olive oil from the sundried tomatoes. 
On top of that you add the glutenfree all purpose flour. Now you add the sugar, xanthan gum, bakers salt or normal salt and the yeast. Make sure the yeast does not come in direct contact with the salt, because that will diminish the effect of the yeast. Then add the sundried tomatoes and parmesan.

Mix it on a slow mode for 2-3 minutes first. When it's mixed well, put the mixer on a fast mode a mix some more (usually 6-8 minutes will do). Mind you, this will train your arm muscles, mixing is hard work. 

Grease a bread mold and transfer the dough into it. Even it out. Top it with the Italian herbs and the extra grated parmesan cheese. Put the dough in the preheated oven and add a bowl of water, that will help the proofing process of the dough. Put the timer on 50 minutes. 

When your dough has risen to double it's size, take it out of the oven and cover with a damp dishcloth while you preheat the oven to 225 centigrade or 437 Fahrenheit. After ten minutes, put the bread (without the dishcloth) back into oven. Leave the bowl with water in the oven and bake the bread in 45-50 minutes until it smells heavenly and is golden brown. 

When it's done, leave it to cool on a wire rack under a fresh (dry) dishcloth for at least an hour and a half. When fully cooled, enjoy a slice or slice it up and put it in packets in the freezer to enjoy later.  

zaterdag 16 maart 2013

Glutenfree & Dairyfree Cinnamon & Honey spiced gingerbread

Anything is possible is my motto when baking glutenfree and it also is my firm believe that being a celiac is not something to be pitied. I dislike pity very much because it doesn't get you anywhere. It is of no help what so ever. I like action. I like people who take things in their stride instead of feeling sorry for themselves or for others. When I tell people my boys are glutenfree, I often get that pityful look and people say: "Isn't that just awful? Those poor things!" 
I always tell them not to be sorry for them, because this diagnose maybe has a big influence on your life, it's not the end of the world. My kid has been tested on far worse, so celiacs disease to us is not that big of a deal anymore. In fact, I think my boys get fed better than many kids out there, who are completely healthy. I do ask them that instead it would be very much appreciated if they could please remember my boys diet for life when making birthday treats for their own kids at school. They are free to ask me for tips and recommendations beforehand, but please accommendate my kids just once a year. It's not scary, it's not pityful, it's just their reality. And being thought of is all they really want. You don't have to go out of your way, a simple treat is all it takes. This glutenfreemomma takes care of the rest. Little by little I try to teach people that glutenfree does not equal scary or difficult. 

This blog has been set up for the same reason. To show that glutenfree doesn't mean the end of the world, that you have many, many options to eat healthy and that it is just as yummy as normal food. Yes, you will always have to be attentive to what you eat, but don't let the label glutenfree stop you. Ever! Celebrate your diet, don't fear it. Don't envy "normal" people for their food, your food is just as wonderful as theirs. This Cinnamon & Honey spiced gingerbread is perfect proof of that. Perfect for a cold chilly day with a cup of tea and a good book. 


Ingredients:

  • 200 grams (7 oz) of rice flour
  • 200 grams (7 0z) of buckwheat flour
  • 1.5 teaspoon of baking soda
  • 2 teaspoons of cinnamon spice
  • 1 teaspoon of xanthan gum
  • 1 teaspoon of fiber husk
  • half a teaspoon of clove spice
  • 2 eggs
  • 100 grams (3.5 oz) of dark caster sugar
  • 100 mililiters (3.5 fl oz) of boiling water
  • 100 mililiters (3.5 fl oz) of fluid honey
  • 100 mililiters (3.5 fl oz) of olive oil or sunflower oil
  • powdered sugar to decorate 

Instructions:

  1. Preheat the oven to 180 degrees centigrade (350 degrees fahrenheit) 
  2. Sift the flour, spices, baking soda, xanthan gum, fiber husk and sugar into a bowl. 
  3. Add the two eggs and the honey and mix it all. 
  4. Add the oil and the boiling water and mix it to a smooth yet thick batter. 
  5. Transfer it into a greased cake tin and bake in the oven for about 40 minutes until golden brown.
  6. Let it cool on a wire rack and dust with powdered sugar before serving. 


dinsdag 12 maart 2013

Typically Dutch: "Kruidnootjes"

For those of you who don't know yet, us Dutchies are a bit weird. We have very strong traditions, even if we can be liberal when it comes to many things. One of the traditions that we have is that we celebrate "Sinterklaas" in December or as I tell my foreign friends: Dutch Santa. An old Bishop and his soot covered helpers (sort of like Santa's elves) visits our homes and he leaves a gift in your shoe. 
Well, with this tradition comes traditional candy too and of course, it's made with flour. My kids love the traditional "kruidnootjes", tiny cookies flavored with spices resembling gingerbread spices. I'm posting this glutenfree, eggfree, milkfree recipe now instead of December, because frankly, my kids love these things any time of the year. So why shouldn't you? ;-)


Mind you, these are a bit different from regular "kruidnootjes" (are you tongue tied yet from trying to pronounce that?) they turn out fluffy and light instead of crispy. 

Ingredients:
200 grams (7 oz) of glutenfree flour or 100 grams (3.5 oz) of buckwheat flour and 100 grams (3.5 oz) of rice flour 
80 grams (2.75 oz) of dark caster sugar 
1 tablespoon of gingerbread spices (in Dutch: speculaas- of koekkruiden)
a pinch of salt
1 teaspoon of xanthan gum
1 teaspoon of baking soda
100 grams (3.5 oz) of margarine or oil (I use real butter though, because my kids aren't lactose free and that tastes even better)

Do check the spice mix if you buy it ready made, some aren't glutenfree!

Instructions
  1. Mix the flour with the caster sugar, spices, xanthan gum, salt and baking soda in a bowl. 
  2. Add the cold margerine (chopped in tiny pieces) 
  3. Knead the flour and butter mass into a firm dough. Pu the dough in the fridge for half an hour to allow it to firm further. 
  4. Preheat the oven to 150° centigrade (300 degrees fahrenheit).Line a baking tray with baking paper or butter. 
  5. Make tiny little balls from the dough, put them on the baking tray and flatten them a bit. 
  6. Bake them in the oven for 10-15 minutes till they are golden brown. 
  7. Leave to cool before you devour them. 

maandag 11 maart 2013

Cheesecake that is no real cheesecake

As the baking addict that I am, I constantly try to find reasons to bake something. I therefor love birthdays because they are a legitimate reason to bake. But... in my case anything can be a reason to bake. Why? Because it stops my mind from spinning, i relax while I whisk eggs, measure sugar and flour and my creativity flows when i decorate and fumble with marzipan. But... someone has to eat all that I create and my family is not always inclined to do so, so I have to restrain myself and tell myself that the sun shining is NOT a reason to bake today. :-)   
This weekend I celebrated my birthday with friends and family, so that was reason for me to go all overboard! No restraints... time to bake!!! YAY! And my husband? He watches me in the kitchen and  shakes his head. He, for the love of all that is holy, does not understand why I want to try out new recipes for this celebration. In his mind, I whip up some cupcakes that i've already made a gazillion times and that everybody loves, and be done with it in a flash. Unfortunately, this glutenfreemomma doesn't work that way. Firstly, I like a challenge, life would be so boring without a challenge, wouldn't it? 
Secondly, I hate boring and predictable. I'm not boring and predictable (I hope). So what i serve mustn't be boring either. So, something new it is. 

This time I decided to bake a cheesecake. Well, in Holland we call this thing a cheesecake, but it really isn't one. This one is made with a fresh cream cheese called MonChou & whipped double cream and you refridgerate it. It's not difficult, but I had never made one glutenfree. All I knew before I started was that I wanted to use my shortbread cookie dough as a base. Now, here's the end result:

Doesn't that look delicious?

Ingredients for the filling
For the shortbread base, please look up the ingredients in the original recipe linked in this blog! 
- 80g (about 3 oz) caster sugar
- 100g (almost 4 0z) MonChou or another fresh Cream Cheese
- 250ml (8.5 fl oz) whipped double cream
- 1 sachet of whipping  cream stiffener (is that actually a word???)
- Two cans of cherries (use fresh ones when in season!!!)

 Instructions: 
1. Line a baking tray or pie dish with baking paper.
2. Make the shortbread dough
3. Spread the mixture over the bottom of a greased pie dish or baking tray.
4. Press it until it looks firm and even and refrigerate for half an hour. 
5. Preheat the oven and bake accordingly to the shortbread cookie recipe.
6. Take the base out of the oven when golden brown and  let it cool completely.

MonChou/cream cheese-filling
When the base is suffienctly cooled down, you can finish the cream cheese-filling and top it with cherries.

1. Mix the sugar with the cream cheese.
2. Whip the cream with the whipping cream stiffener (this sounds so weird to me, but Google tells me its correct and who am I to oppose Google, right?). Add the cream cheese-mixture to it and slowly fold it in.
3. Spread the filling on the shortbread base. 

4. Now garnish with the cherries.
5. Put the cheesecake into the fridge for a couple of hours for a firm double cream and fresh cream cheese filling. You can make this pie a day in advance and it will be perfect the day after as well!


Enjoy!!!!!

donderdag 7 maart 2013

Raisin & Quark Cheese Bread

If you are planning to make a glutenfree High Tea this soft, cakelike bread has to be amongst the other goodies you serve. It's full of flavour and all it needs is a bit of butter to make your tastebuds do the Harlem Shake in your mouth. Yeah, sorry, I had to go there! :-)

Anyway, it's a great bread to serve on the Easter breakfast table too and my kids like it very much. The raisins add extra fibers that my kids need so it's a win-win situation actually. It's not a healthy kind of bread due to the amount of sugar in it, but ever seen a healthy High Tea? ;-)


Now doesn't that look delicious?

For those of you who have no clue what Quark Cheese is (it's very common in The Netherlands): 
Quark is a type of fresh cheese. It is made by warming soured milk until the desired degree of denaturation of milk proteins is met, and then strained. Dictionaries usually translate it as curd cheese or cottage cheese, although most commercial varieties of cottage cheese are made with rennet, whereas traditional quark is not. It is soft, white and unaged, similar to some types of fromage frais. It is distinct from ricotta because ricotta (Italian: "recooked") is made from scalded whey. It is quite similar to the Indian paneer. Quark usually has no salt added. (Wikipedia)

Ingredients:

  • 500 grams (1 lb and 2 oz) of glutenfree all purpose flour
  • 1 teaspoon of baking powder
  • 200 grams (7 oz) of white caster sugar
  • Grated lemon zest (I used that of a whole lemon, the original recipe says 1 teaspoon, but you can hardly taste that)
  • 8-10 grams (0.25 oz) of vanilla sugar 
  • 3 eggs
  • half a teaspoon of salt (I use iodized salt)
  • 130 grams (about 4.5 oz) of melted butter
  • 350 grams (12 oz) of Quark Cheese. 
  • 350 grams (12 oz) of mixed raisins
Instructions:

  1. Preheat the oven to 170 degrees centigrade (325 degrees fahrenheit). 
  2. Mix the all purpose flour in a large bowl with baking powder, caster sugar and vanilla sugar. 
  3. Add all the other ingredients to the flour and sugar mix and knead well. 
  4. Butter a baking tin and transfer the dough into the tin. 
  5. Bake until golden brown in about 70 minutes. 
  6. Take the bread from the tin when done and let it cool on a wire rack. Dust with powdered sugar before serving. Cut into slices and serve with (salted) butter or maybe some marmelade.
Enjoy! 

Ps. I love sharing my recipes and I would love to know experiences with them if you happen to make one of my recipes. Together we can make them even better so don't hesitate to post your opinions and suggestions to my recipes. 


zondag 3 maart 2013

Fairly healthy cupcakes with a fruity twist

In less than two days time I'll turn 37. What? Yes, I'm still a tad bit in denial, but on Tuesday I'll be 37. ACK! ;-)
But a birthday also means treating your colleagues, so I baked two fruity cupcakes for them. A bit of a risk, as i had never made them before, and had to adapt it as the original recipe was a 'gluten recipe'  but... they turned out quite awesome (if i say so myself), so I feel comfortable to share them here. 

Firstly: Blueberry cupcakes with oatmeal (this recipe makes 12 cupcakes)


Ingredients:
  • Preheat the oven to 200 degrees centigrade (400 degrees fahrenheit)110 grams (about 4 oz) of oat flour
  • 75 grams (2.75 oz) of rice flour
  • 1,5 teaspoon of baking powder
  • 0,5 teaspoon of baking soda
  • 100 grams (3.5 oz) of oatmeal
  • 75 grams (2.75 oz) of granulated sugar
  • 2 eggs
  • 1 teaspoon of xanthan gum
  • 2 tablespoons of clear honey
  • 170 ml (3/4 of a cup) of buttermilk
  • 55 ml (about 1/4 of a cup) of sunflower oil or olive oil. I used olive oil. 
  • 1 tl vanilla aroma or a pod of vanilla
  • 125 grams (4.5 oz) of blueberries
Instructions:
  1. Put the paper cups in the muffin or cupcake tray.
  2. Put the oat flour, the rice flour, xanthan gum, baking powder and baking soda in a bowl, mix  and add the oatmeal and sugar. 
  3. Beat the eggs and honey in another bowl, add the buttermilk and vanilla aroma or vanilla seeds form the pod and whisk well.
  4. Add the egg mixture to the flour mixture and beat it until everything is mixed, the batter can be a bit lumpy. Fold the blueberries into the mixture. 
  5. Spoon the batter into the molds. bake them 20 minutes until golden brown. let them cool for about 5 minutes, take them out of the tin and cool on a wire rack. 

Secondly: Banana-dates cupcakes (yes, I want people to have a choice and it's a great excuse to bake more things LOL) This recipe makes 15 tiny cupcakes or 12 big ones. 


Ingredients:
  • 2 very ripe bananas
  • 175 grams (6 oz) of dates, without kernels and chopped or blitzed to tiny pieces. 
  • 2 eggs beaten 
  • 125 ml (half a cup) of olive oil
  • 175 grams (6 oz) of fine granulated sugar
  • 1 teaspoon of baking soda
  • 1 teaspoon of baking powder
  • 1 teaspoon of vanilla aroma or a vanilla pod 
  • 175 grams (6 oz) of rice flour
  • 2 teaspoons of xanthan gum

Instructions:

  1. Preheat the oven to 180 degrees centigrade (350 degrees fahrenheit). 
  2. Put the paper cups in the muffin or cupcake tray.
  3. Mash up or blitz the bananas. Put them in a big bowl, add the eggs and oil. Mix well. 
  4. Add the sugar, baking soda, baking powder, vanilla aroma, rice flour and xanthan gum. Mix well till the mixture is completely blended. Fold in the chopped dates untiol evenly spread. 
  5. Spoon the batter into the paper cups. If you have left over dates, slice them in half and put a half on every cupcake. 
  6. Put in the oven and bake for 20-25 minutes until golden. Let them cool for 5 minutes, then remove from the tin and let them fully cool on a wire rack. Before serving, dust them with powdered sugar. 
Happy birthday to me! Eeerm... enjoy! :-D

zaterdag 2 maart 2013

Greek moussaka made from scratch

I sometimes wonder why food producing companies make my life (and that of others suffering from allergies or intolerances) so incredibly difficult, especially on days when time seems scarce and you would like to produce an easy meal just like that. You know, when you can run through the supermarket grab anything box with a meal on it you fancy and get the extra ingredients to toss into a ready made sauce and so on and so forth. But you can't, because those ready to cook kinda meals are filled with those buggers of gluten. I can't count the times anymore that I sighed and said: Why for heaven's sake can't they use maize starch instead of wheat starch or flour???? 
But I know exactly why, because this glutenfreemomma once worked for a milling plant, and flour is much more inexpensive than any starch. Yes, I've worked for a company specialized in the products that make my kids sick. Stay close to the hazard and you learn so much!! Which products are made with flour for example, but also about the nutrients my kids miss because they can't eat normal bread etc. It was a great experience and I can also tell you, flour and wholemeal is not a unhealthy product, it only is if it makes you sick. So to those thinking glutenfree is healthier. It's not! I can't stress this enough. If you are not in some way sensitive, allergic or intolerant to gluten or wheat, don't do this diet! 

But I'm drifting off. Where was i? Oh right: actually, I should thank the food producing industry, because they force me to make many things from scratch, sparing me and my family from extra added sugars, preservatives and other stuff you basically don't need. I get to taste food the way it was meant to taste, even though I sometimes "cheat" by grabbing a tin of chopped tomatoes instead of the fresh ones. Hey, I'm only human and a busy, working mom and wife so I am allowed to cheat like that. Well, one day i got so frustrated by staring at those ready made meals, that I grabbed the packet of Greek Moussaka (which I loved, but didn't know how to make from scratch in a way that it tasted like actual Moussaka) and walked through the supermarket grabbing everything from the back listed and decided to buy it. At home I googled for a decent recipe and adapted that with the extra ingredients (mainly herbs, the secret is in the herbs!!!) I saw listed on the back of that "Moussaka ready in half an hour' box. Here's the recipe for it. The moral of this tale? You can make anything glutenfree if you want to invest time and effort! In this case, you invest the time, I've invested the effort for you! ;-)
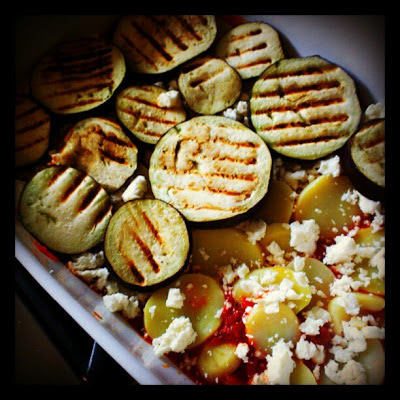
Glutenfree, vegetarian (if you eat dairy & eggs) Greek Moussaka in the making


Ingredients:
  • 450 grams (1 lb) of minced meat (optional, I don't use the meat, my kids love it better without)
  • 1-2 eggplant (I mostly use two as I love to make a big tray of moussaka and then freeze the left overs for an easy meal on a busy day).
  • 450 grams (1 lb) of precooked sliced potatoes (you can also peel potatoes, cook them in salted water for about 10-15 minutes and let them cool before you slice them, they fully cook in the oven)
  • 3  tins of 400 grams (14 oz) of chopped tomatoes (or an equal amount of fresh ones that you chop off, but i can't be bothered. ;-))
  • 0.5 a jar of sundried tomato tapenade
  • a glove of garlic (two if you like the taste of the Mediterranean ;-))
  • pinch of salt
  • pinch of pepper
  • two teaspoons of oregano
  • two teaspoons of tarragon
  • one teaspoon of thyme
  • two teaspoons of dried basil 
    (if you want to use fresh herbs, put in a bit more because the dried versions are often more powerful, but fresh herbs are even better!)
  • 250 grams (9 oz) of thick greek yoghurt
  • 2 eggs
  • 100-200 grams (3.5 to 7 oz) of grated parmesan cheese 
  • 1 packet of feta cheese (about 7 oz?)


Instructions:

Preheat the oven to 200 degrees centigrade (400 degrees fahrenheit).

Slice the eggplant and sprinkle them with a bit of salt. This will help release the excess water in the product. Leave for 10 minutes while you preheat a grillpan. Pat off the excess salt and water with some paper towel. Grill the slices in the grillpan until they have those beautiful black grill stripes. Set aside. 

If you make the moussaka with minced meat, put this in the pan bake it while loosening it.  Add the tins of chopped tomatoes and press in the clove(s) of garlic. Add the sundried tomato tapenade and  add the spices. Taste. If you feel it needs a bit more of something, just add it! 
Mix the yoghurt with 1/4th of the grated parmesan and 1/4th of the feta (crumbled) and two eggs. Add some salt and pepper to finish it. Set aside.  

Grease a pyrex oven tray/bowl. Put half of the tomatoe/minced meat sauce in it. Spread half of the potatoe slices on top of it. Crumble half of the feta that is left on it. Add half of the eggplant on top of it. Now repeat all the layers and finish with the yoghurt mix on top of the second layer of eggplant. 

Put in the oven for about 35 minutes. Serve with a Greek salad. 

Bon appetit!